
Exporting stems for a mixdown? This is how I ask all clients to provide stems for me at Keep Thinking Music. Every mix engineer is different, but this guide will help you understand the general requirements for exporting your audio files for a professional mix.
With specific and well identified files, less time is spent sorting them out, and more time is spent working with your music!
Depending on how the mix is booked, there are two routes to consider.
What’s my mix type?
Your mix type is the option you chose when booking (or are about to choose).
4, 8 or 16 stem mix – you group your tracks into a set number of stems, e.g. all your drums on one file. A good fit for simpler arrangements, at a lower price. The specifics of this are detailed below.
Unlimited stem mix – you send every channel on its own. This is usually the most popular option for busier tracks as it gives me full control over the final mix.
Not sure? A £25 Track Check (opens in a new tab) will tell you which fits your track.
1. Save As a new copy
Open your project and save a copy for the mixdown (in Ableton, File > Save Live Set As…). Add something like “_MIX” to the name. That way your original stays untouched and you can revert to it if needed later.
Once you have saved your new version, now is the time to commit any external instruments that haven’t been recorded in yet. You may also wish to bounce some of the finished MIDI instruments down to audio, but that’s really your call. I usually FREEZE all of my channels, so the audio will always play in the future, even if I no longer have the plug-in, or if support for it is dropped later down the line.

2. Clear the master channel and check your levels
Master effects – remove or switch off all limiters, compressors and EQ on the master channel before exporting anything.
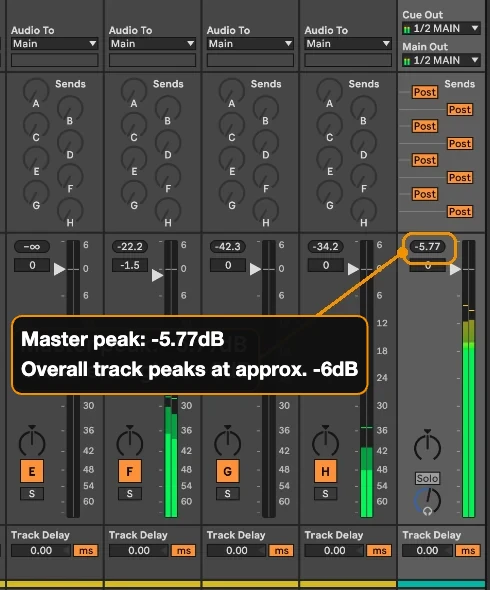
Headroom – make sure there is no red-lining or clipping at any point in the track. A good habit is to have your track master levels peak at no more than -6dB at the loudest point. In most cases you can bring the individual faders down (NOT the master fader!) in unison to achieve this, without losing your balance. Also check individual channels are not clipping into their faders before they hit the master, unless it’s intended for creative effect. The -6dB figure is a guide, not a hard rule: anywhere around -6dB is fine. What matters is no clipping and nothing limiting your master. For the background, read my explainer: The -6dB Headroom Myth.
3. Label everything
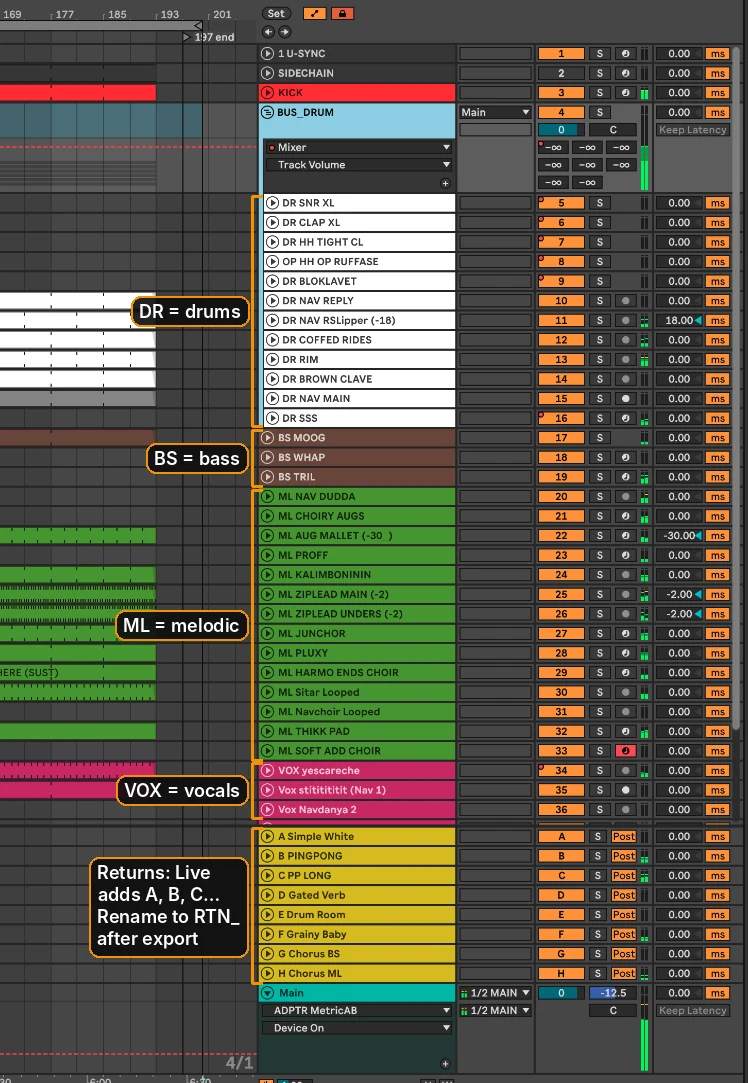
Label each track clearly and prefix it. I use “DR” for drums, “BS” for bass, “FX” for effects, “BUS_” for buses/groups, and so on. For example:
- DR_Open Hats
- DR_Shaker RH
- BS_Moogy Bass
- FX_Sweep 1
- BUS_DRUMBUS
It’s helpful to prefix your return tracks too (RTN_), so I can easily identify them. Simple file names mean I spend less time sorting through your audio and more time working on it!
Note: Live won’t print the RTN_ prefix on your return files, even if you type it into the track name. Returns export with their letter prefix as standard (e.g. A Reverb), so batch rename them after you print, e.g. RTN_A Reverb.
4. Export your stems
4, 8 or 16 stem mix
For 4, 8 or 16 stems, I ask clients to use the default set below. If your track needs something different, please let me know. Not sure which option fits your track? Then it’s well worth a £25 Track Check (opens in a new tab) first. I’ll advise which option I feel will be most beneficial for your music, and the £25 comes off your mix or master if you book it within 60 days.
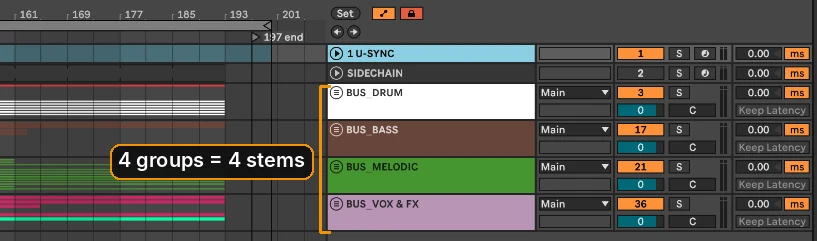
4 stems
- Drums (incl. percussion)
- Bass
- Music (synths, pads, keys)
- Vox & FX
8 stems
- Kick
- Drums (snare, claps, hats)
- Percussion
- Bass
- Leads / Arps
- Pads / Chords / Atmos
- Vox
- FX (risers, impacts)
16 stems
- Kick
- Snare / Clap
- Hats & Cymbals
- Percussion
- Drum Loops / Tops
- Sub Bass
- Mid Bass
- Lead 1
- Lead 2 / Arps
- Chords / Keys
- Pads / Atmos
- Synth FX / Textures
- Vox
- Vocal Chops / Adlibs
- FX (risers, impacts)
- Any Other Focus Stem / Spare
Building your stems – group the tracks for each stem (in Ableton, select the tracks and press Cmd+G on Mac or Ctrl+G on Windows) and name each group to match the list. Leave the group FX on. On these options, the group is the stem.
Returns – export your returns as separate files: print each return on its own. Whatever channels you have sent to that return will all play on that single return file. If you are using returns, the first 2 return stems are not counted towards your overall stem count.
Returns go by different names depending on your DAW: return tracks (Ableton), aux tracks (Logic, Pro Tools), FX channels (Cubase, Studio One) and FX tracks (Bitwig). In FL Studio, they are the mixer tracks you send your effects to, often called send tracks.
Export (step 5), then send only your group files and your returns.
Unlimited stem mix
For unlimited stems, export each individual channel so it prints as its own full song length track, e.g. Kick, Moog Bass 1, Virus Arp.
Channel effects – keep all the effects you have used on each channel, including delays, reverbs, EQ and compression. If I need you to remove an effect on a certain sound, I’ll be in touch.
Sends/returns – if your project uses sends/returns for effects (such as reverbs or delays), print each return on its own. Whatever channels you have sent to that return will all play on that single return file.
Returns go by different names depending on your DAW: return tracks (Ableton), aux tracks (Logic, Pro Tools), FX channels (Cubase, Studio One) and FX tracks (Bitwig). In FL Studio, they are the mixer tracks you send your effects to, often called send tracks.
Groups – you can include your group files as well (e.g. your Drum Bus). Be mindful that group/bus FX are not baked into the individual track prints:
- For FX that act the same at track level (e.g. filter downs, gain automation, general EQ) – copy them onto each track in the group, then remove the group FX. There should be no change in sound, but double-check!
- For FX that only suit the group (e.g. bus compression, big transitional FX) – leave them where they are and include some screengrabs of the settings and automation.
If you would prefer me to just use the group stem for particular sounds, just let me know!
5. Export settings
- 24-bit WAV
- 48 kHz (44.1 kHz is also accepted)
- No dither (or equivalent)
- No normalising
- Full track length, every file starting from 0:00
In Ableton: File > Export Audio/Video. Set Rendered Track to “All Individual Tracks” and turn OFF “Include Return and Master Effects”. Make sure the export starts at bar 1 and runs to the end of the track. Live renders each track as its own file. Group files include the group’s effects; the tracks inside a group do not.
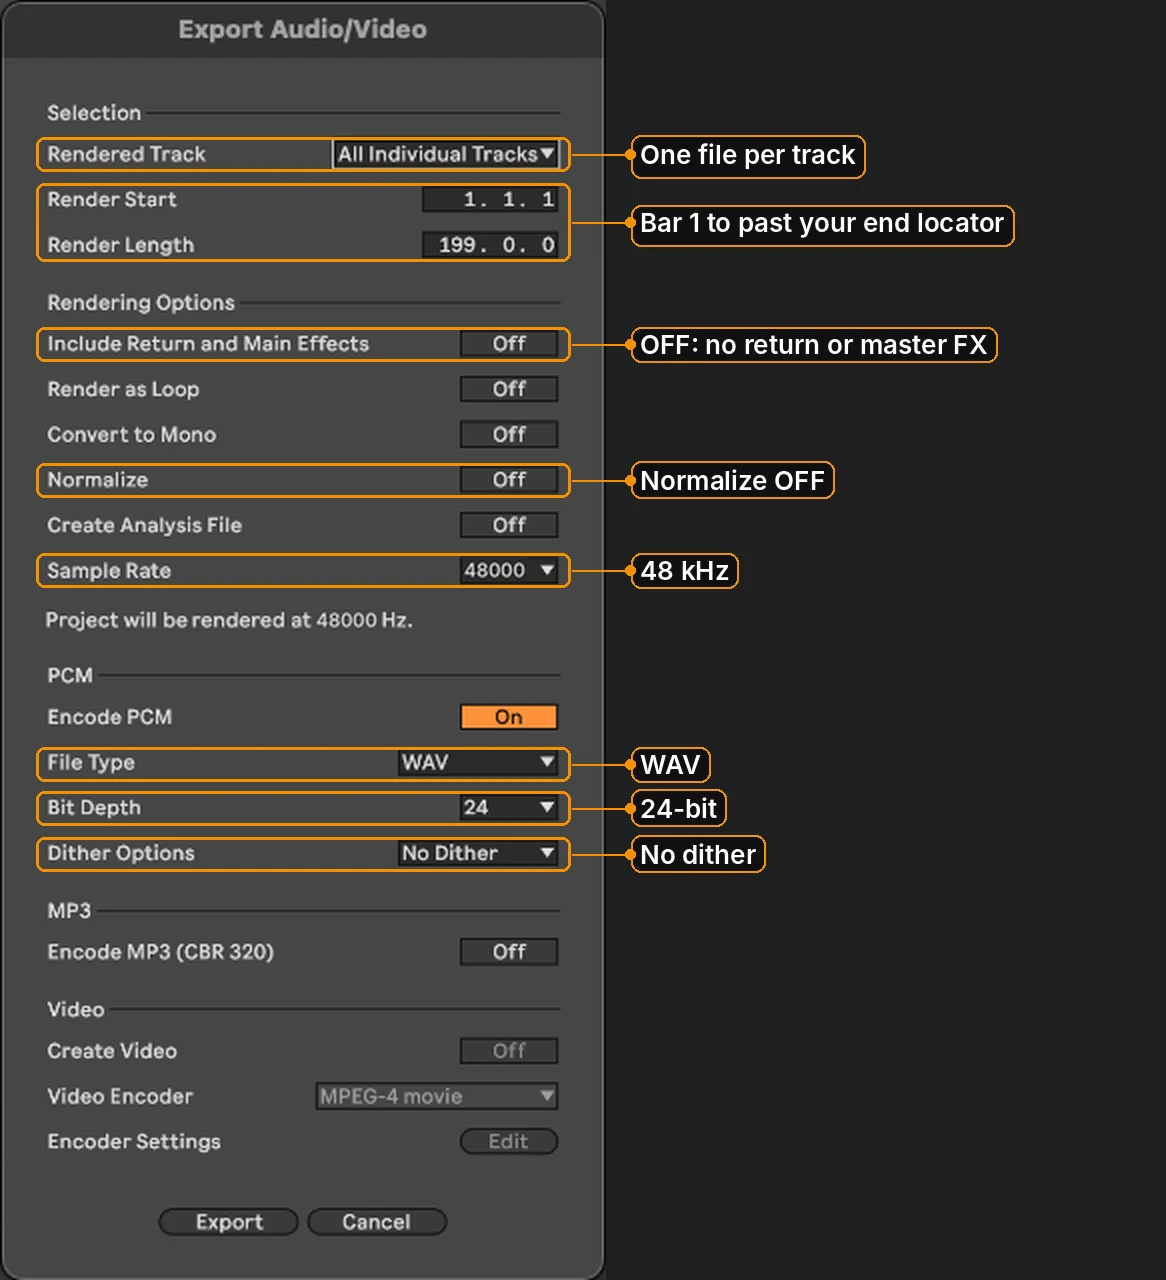
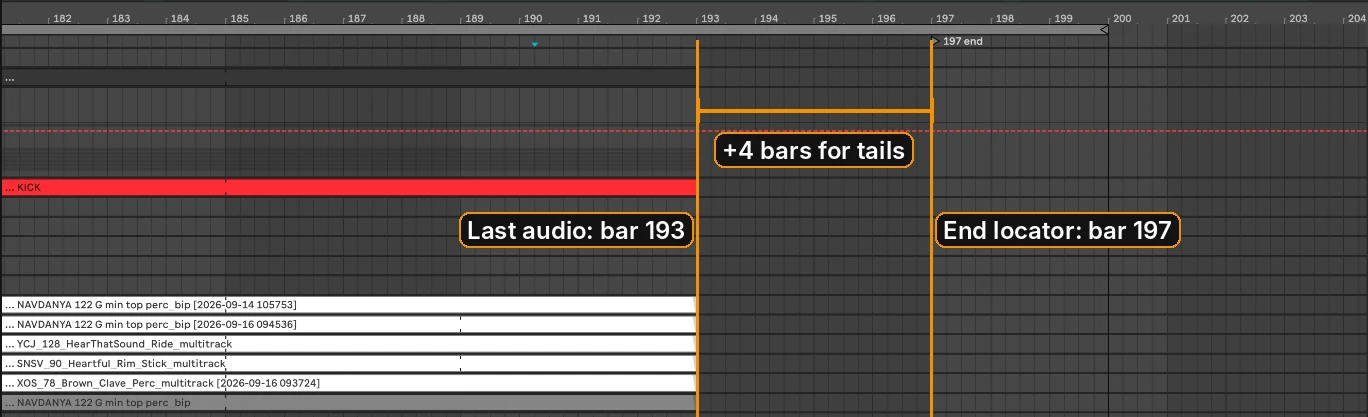
Note: export a few seconds past the end of the audio, so no reverb or delay tails, or fades, get cut off. I’ll trim any silence at the start and end (top and tail) when preparing your master.
6. Add your reference bounce
Reference/Arrangement Mix – include a clearly labelled bounce of your full arrangement in its current state. This lets me check all files have been received and play back as per your original arrangement.
[Optional] Artist references – mixing styles vary significantly by genre! If you have a specific sound in mind, include 1 or 2 tracks from other artists that capture a similar vibe.
7. Zip and upload
Put everything in one folder named with your track title and zip it. If you are booked in with me, upload it using the link I send you after you order. I’ll check everything over and let you know if there are any issues.
Only need mastering?
Please provide your track as a 24-bit WAV at 48 kHz, at no greater than -6dB peak on the master channel throughout the track. No effect chains on the master channel, no normalising, and export without dither if you have the option.
Okay Kris, but what if I’m not on Ableton?
No problem. Most DAWs have an option to export all tracks in one go – look in your DAW’s export menu. The same rules apply: full length from 0:00, 24-bit WAV at 48 kHz, no dither, master effects off, and returns printed as their own files. If in doubt, drop me a line.
Quick checklist
Have you…